
Custom Fields
Custom fields let you attach your own information to checklist items — an expiry date, an aisle number, a “bought where”, a size, a yes/no flag. You define a field once for the house or for a single list, and it then appears on every item it applies to, ready to fill in. Date fields can also send a reminder before they come due.
There are two things you do with custom fields: define them in the manager, and fill in their values on individual items.
Define fields in the manager
Section titled “Define fields in the manager”The custom fields manager is where fields are created, edited and removed. Managing fields is controlled by a house permission — a member without it can still fill in values, but does not see the manager.
-
Open a list, or the checklists overview.
-
Open the … actions menu and select Manage custom fields. It sits alongside Manage labels and Manage stores.
-
The Custom fields dialog opens with your fields grouped by scope.
-
Open the Checklists screen.
-
Tap the Custom fields button in the toolbar, or open the ⋮ menu and select Custom fields.
-
The Custom fields screen opens with your fields grouped by scope.
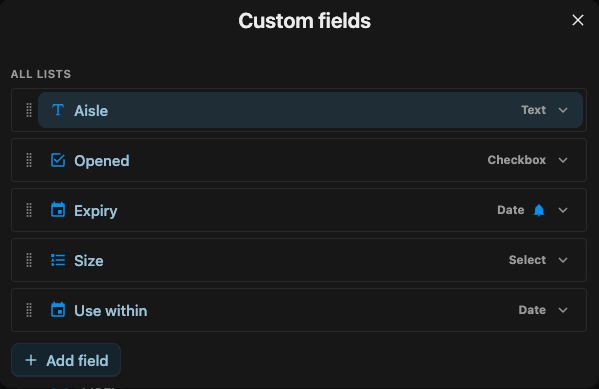
Where fields live: scope
Section titled “Where fields live: scope”Every field has a scope that decides which items it applies to:
- All lists — a house-wide field that appears on items in every list.
- A single list — a field that appears only on that list’s items.
In the manager, fields are grouped under headers by scope: All lists first, then one group per list that has fields. An item’s fields are the house-wide fields plus its own list’s fields, so a single item can show both. You change a field’s scope from the Scope control in its editor, which moves it to the matching group.
The field editor
Section titled “The field editor”Selecting a field expands it in place to reveal its editor; Add field at the bottom creates a new one. The editor’s controls, top to bottom:
- Name — what the field is called on items.
- Type — one of the five types below. The type is chosen when the field is created and cannot be changed afterwards.
- Scope — All lists, or one specific list.
- Hint text — an optional placeholder shown in the empty value control, to prompt whoever fills it in. Applies to text, number and select fields.
- Type-specific options — see each type below.
- Default value — an optional value pre-filled on new items.
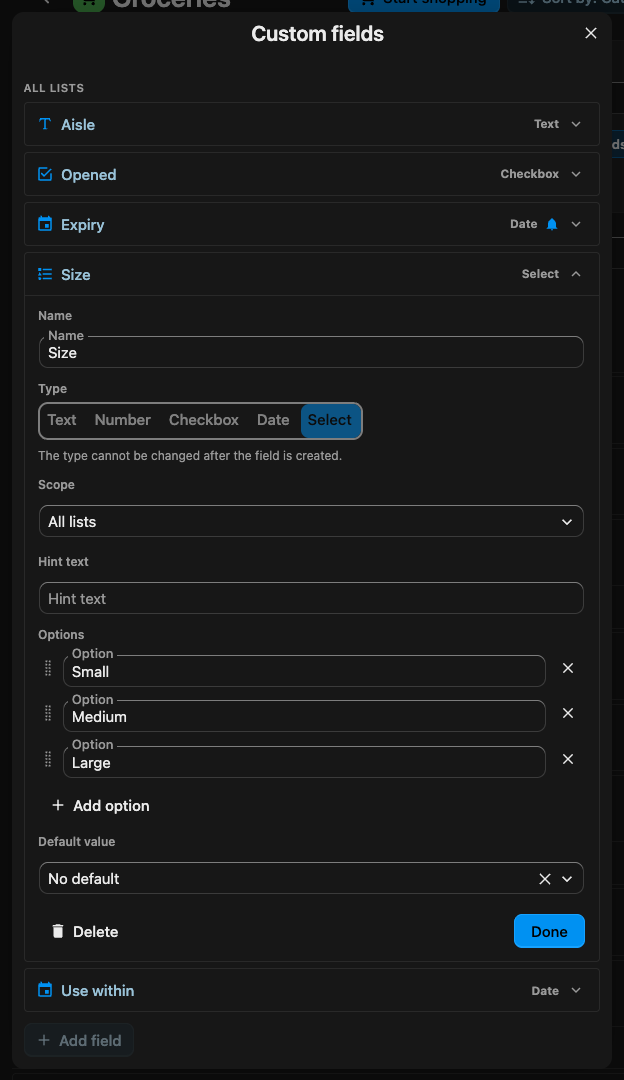
Reordering fields within a scope is done by dragging a field’s handle. Fields you no longer need are deleted from inside the editor.
The five field types
Section titled “The five field types”- Text — a line of text, or a multi-line area when Multi-line text area is turned on.
- Number — a numeric value.
- Checkbox — a simple on/off toggle.
- Date — a calendar date, with optional reminders (see below).
- Select — a single choice from a list of options you define. Add, rename, remove and drag to reorder the options; renaming or reordering never disturbs values already chosen.
- Text — a line of text, or a multi-line area when multi-line is turned on.
- Number — a numeric value.
- Checkbox — a simple on/off toggle.
- Date — a calendar date, with optional reminders (see below).
- Select — a single choice from a list of options you define. Add, rename and remove the options; a value already chosen follows its option even if you rename it.
A default value pre-fills the field on newly added items: default text or number, a checkbox that starts on, or a pre-selected option. Date fields have no fixed default — a relative date instead carries a default offset (see below).
A list can replace a field’s default for its own items, or have it remember the last value used — see item defaults.
Fill in values on an item
Section titled “Fill in values on an item”Applicable fields appear in a Custom fields section when you add or edit an item, one control per field. Anyone who can add or edit items can fill them in.
Open an item to edit it, or expand the composer when adding one, and fill in the Custom fields section. Each control uses its field’s hint as a placeholder while empty.
Open an item to edit it, or use the Custom fields tool in the compose bar when adding one, and fill in the section. An item’s detail screen also shows its set values.
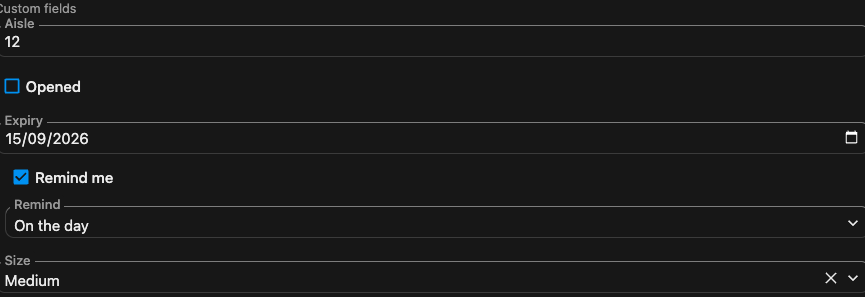
A field you leave alone simply stays unset. If a field later stops applying to an item — its scope changed, or it was deleted — it disappears from the item, but any value you had already set is kept, not thrown away, and returns if the field applies again. Set values are also shown, read-only, when you just open an item to view it.
A text field’s links come out clickable: a URL anywhere in the value is recognized when you view the item, so a product page or a manual can be pasted straight into a field and followed from there.
Date fields and reminders
Section titled “Date fields and reminders”A date field can be entered two ways, chosen by its Date entry setting:
- Absolute — pick a calendar date.
- Relative — enter a number of days from today, which is turned into a real date when you fill it in. A relative field can carry a default offset so new items start with a date already set. On a relative value you can Re-anchor to recompute the date from today, which also re-arms its reminder.
Reminders
Section titled “Reminders”A date field can notify the household before its date arrives. On the field, turn on Remind by default and set how far ahead — on the day, 1, 2 or 3 days before, or 1 week before.
Two more settings shape reminders:
- Reminder override decides whether every item uses the same reminder, or each item sets its own.
- Stop reminding once the item is done withdraws the reminder when the item is checked off, and brings it back if you un-check the item. Left off, the reminder fires regardless of whether the item is done.
When a field allows per-item reminders, each item’s date control offers a Remind me toggle and its own lead time, with a clear note when an item’s reminder differs from the field default and a way to return to it.
In an item’s date control, turn on Remind me and pick a lead time. Custom reminder for this item shows when it differs from the field’s default; Use field default clears the override.
In an item’s date control, turn on Remind me and pick a lead time. Custom reminder for this item shows when it differs from the field’s default; Use field default reverts it.

A reminder goes to everyone in the house who can see the item’s list. Each due date sends its own notification, so an item with two dates due can send two. Opening a reminder takes you straight to the item it belongs to.
Edit and delete fields
Section titled “Edit and delete fields”Change a field any time from the manager — its name, scope, hint, options, default and reminder settings. The type is fixed once the field exists.
Deleting a field removes it from items, but values already set are kept and hidden rather than erased. Removing a select option that items are already using prompts you to choose what happens to those items: move them to another option, or clear the value. An option nothing uses is removed straight away.