
Checklists
Checklists are the heart of Pantry: shared shopping and to-do lists that everyone in the house sees update in real time. An item can carry a quantity, a price, a category, one or more stores, labels, an image, and a repeat schedule.
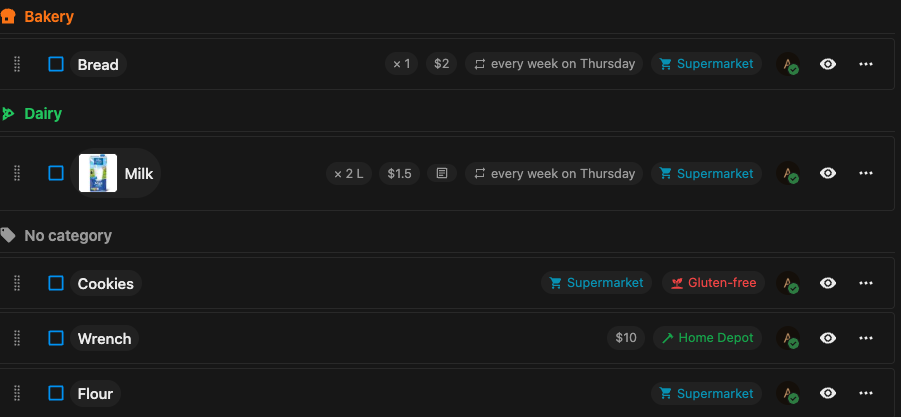
Create a list
Section titled “Create a list”-
Open Pantry in Nextcloud and look at the checklists in the left sidebar.
-
Select New list.
-
Give it a name, and optionally an icon, color and description.
-
Open the Checklists tab.
-
Tap the list name at the top to open the list switcher, then New list.
-
Give it a name, and optionally an icon, color and description.
Each list has settings for its name, description, icon, color and access, plus item defaults that decide what new items on it start with.
All lists shows every item across the house in one place.
Add and check off items
Section titled “Add and check off items”A composer adds an item to the list. Checking an item marks it done: it strikes through and drops to the bottom, and can be un-checked to bring it back.
The composer carries a row of chips — Category, Stores, Labels, Quantity, Price, Description, Recurrence, Image, Barcode — so you can set an item’s details as you add it.

- The composer sits at the top of the list, in a card titled Add item. Type a name in the Item name field, set any chips you want, and press Enter or Add.
- Click a row’s checkbox to mark it done or undone.
- Clicking elsewhere on a row does whatever your Default item click action setting says — out of the box, nothing.
- On a touch screen, long-press a row to start selecting several at once.
- Each row’s menu holds view, edit, copy to list, move to list, archive and trash.
- The composer is pinned to the bottom, labeled Add to … with the list’s name (or Add an item … on All lists). Type there and tap send to add an item.
- Tap a row’s checkbox to mark it done or undone.
- Tapping elsewhere on a row opens the item by default, and long-pressing starts a multi-select — both are configurable.
- Swipe a row for quick actions — view, edit, move, copy, archive, delete.
What a tap or click on a row does is up to you, in Settings:
- Default item click action — Mark as done, View, Edit or None. Default None.
A long-press on a touch screen always begins a multi-select; there are no swipe actions.
- Default item tap action — Mark as done, View, Edit or None. Default View.
- Default item long-press action — the same, plus Multi-select. Default Multi-select.
- Swipe actions — on by default; turn it off to reach the same quick actions from a per-row menu button instead.
The same screen also sets the checkbox side, list density and long-name truncation.
Adding something the list already has
Section titled “Adding something the list already has”As you type a name, matching items already on the list appear under the composer as Already on this list. Tap one to reuse it instead of creating a second row for the same thing — bringing a checked item back rather than duplicating it.
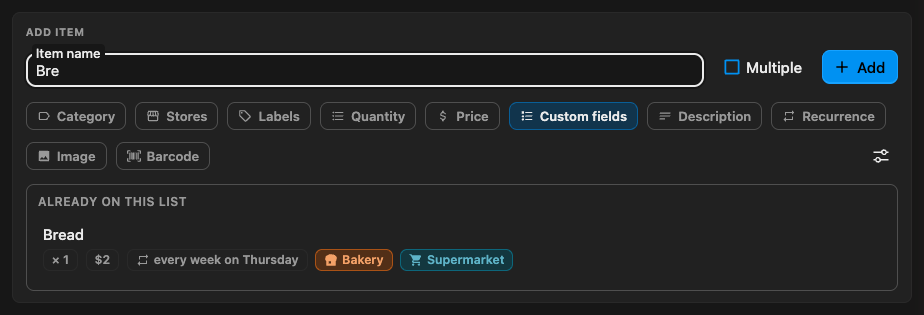
Two settings shape this:
- Reuse existing items — what happens when the name you add already exists: Always ask (the default — a prompt offering Reuse existing or Add anyway), Always reuse, or Never reuse.
- Suggest archived items — off by default; turn it on to search archived items for suggestions too. Reusing an archived item unarchives it.
Item defaults
Section titled “Item defaults”A list can pre-fill the composer, so that every item you add to your groceries list starts at your usual store, or every item on a chores list starts as recurring. Open Item defaults from the list’s ⋯ menu, from the tune button at the end of the composer’s chip row, or from Edit item defaults in the list’s settings.
The dialog shows the composer’s chips for the details a list can pre-fill: Recurrence, Stores, Category, Labels, Quantity and Custom fields. Open a chip and pick how it starts:
- Not set — new items start without a value, as on a list without defaults.
- Fixed — new items always start with the value you pick below.
- Remember last — new items start with whatever the last item added to this list used. The chip reads, for example, Stores: last used.
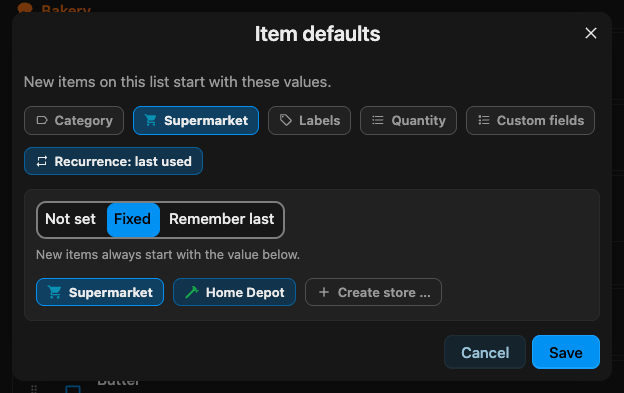
Quantity can be Fixed but not remembered. Price, description, image and barcode always start empty, since they belong to a single item.
Each custom field can likewise use its Field default (the default set on the field itself), a Fixed value for this list, or Remember last.
A pre-filled chip is only a starting point: change it in the composer before adding, and only that item is affected — unless the detail is set to Remember last, in which case the next item starts with your change. In All lists, the composer uses the defaults of the list you pick to add to.
Item details
Section titled “Item details”Set any of these from the composer chips as you add an item, or open an existing item to change them:
- Quantity — free text, so a unit comes along for the ride (“3”, “400 g”, “2 x 1 L”). The + and − buttons step the number inside it and leave the rest alone, in a 1-5-10 progression that grows with the value — 8 → 9 → 10 → 15, 400 → 450 → 500 — so a large quantity is a few taps away rather than a hundred.
- Price — an amount (or a range) used to estimate shopping totals.
- Category — one category, shown as a colored header that groups the list.
- Stores — one or more shops where the item is bought.
- Labels — free-form tags for filtering.
- Image — attach a photo so everyone recognizes the exact product.
- Custom fields — your own fields (a text note, a number, a yes/no flag, a date, or a list of choices) that you define for the house or a single list.

Barcodes
Section titled “Barcodes”Scan or enter a product barcode (EAN or UPC) to prefill a new item from it — Pantry looks up the product and fills in its name, category and photo for you to review before adding. If no product matches, fill in the item yourself.
You can scan with your camera on the phone app, and in the web interface when a camera is available; on the desktop app, type the barcode in by hand.
Organize with categories, stores and labels
Section titled “Organize with categories, stores and labels”Three independent ways to organize a list:
- Categories group items under colored headers (Bakery, Dairy, …). An item has at most one.
- Stores mark where each item is bought (Supermarket, Home Depot, …), and drive Shopping Mode routes.
- Labels are free-form tags for anything else.
You create and manage each set from its picker — Create category…, Create store…, Create label… — and can rename, recolor or delete them there.
Above the list, a free-text filter plus Categories, Labels, Stores and Price filters narrow what you see.
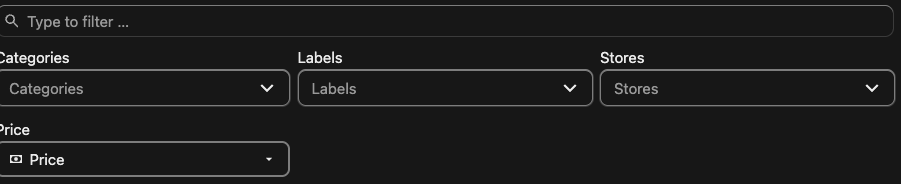
Combine the filters above the list to focus on one store, category or price range, and sort the list from Sort by.
Tap the Categories, Labels and Stores chips under the list header to filter, and the list / grid toggle to switch layouts.
Recurrence
Section titled “Recurrence”Every item is one of three kinds, set from the Recurrence chip:
- Staple — stays on the list after it is marked done.
- One-time — removed from the list once marked done.
- Recurring — comes back on a schedule.
A new item starts with whatever recurrence its list’s item defaults give it. A new list remembers the recurrence of the last item added.
Repeat schedules
Section titled “Repeat schedules”A recurring item repeats on a schedule — for the groceries you buy every week. Presets cover Daily, Weekly, Every 2 weeks and Monthly; past those, build the rule yourself from Every n days, weeks, months or years:
- Weeks — the weekdays to repeat on.
- Months — either days of the month (leave it empty to repeat on the same day each month), or a weekday of the month: First, Second, Third, Fourth or Last, paired with a weekday — the second Tuesday, the last Friday.
- Years — a date of the year (leave it empty to repeat on the same date each year).
A repeat can also end: never, after a number of occurrences, or on a date. A summary of the rule you built is shown as you go.
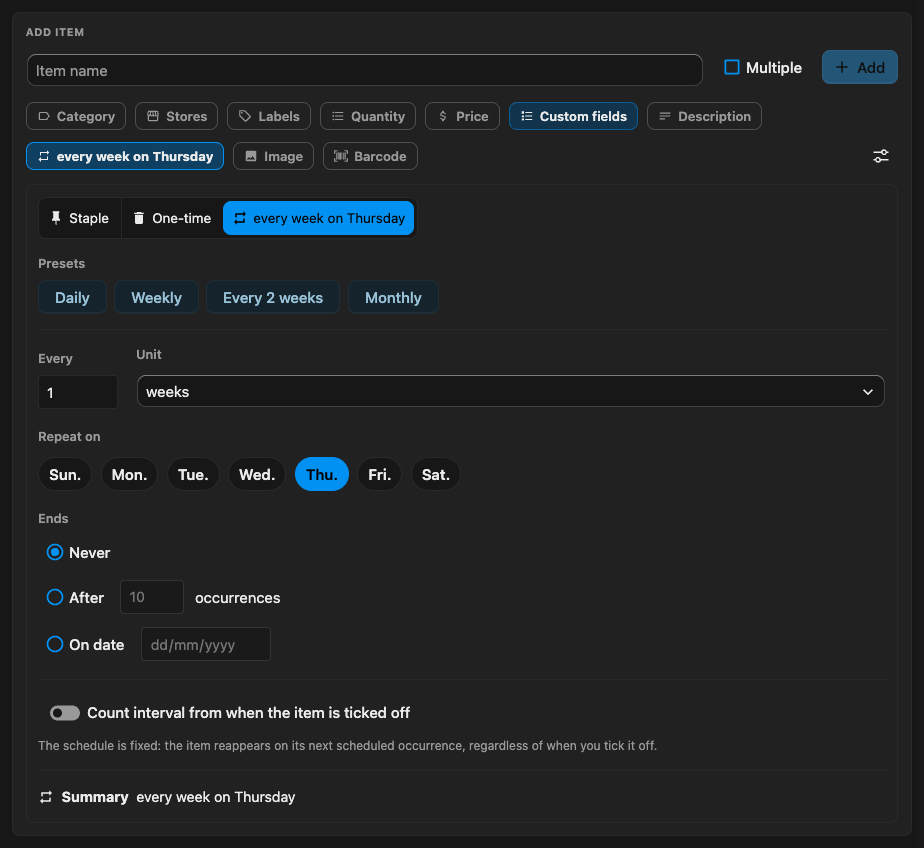
Pantry brings the item back on its next recurrence after it is checked off, anchored one of two ways:
- On a fixed schedule (default) — the item comes back on its next scheduled date, no matter when you actually tick it off. A weekly item stays on the same weekday even if you shop a few days late.
- Starts after completion — turn this on to count the interval from when the item is ticked off instead. A “every week” item you buy two days late then returns a full week from that purchase, not from the original date.
Import and export
Section titled “Import and export”You can move lists in and out of Pantry as Markdown checklists:
- Import from Markdown — paste a Markdown list or drop a
.mdfile to create items in bulk. - Export to Markdown — copy the list out as a Markdown checklist.
You can also copy or move items to another list from the item menu.
Archive and trash
Section titled “Archive and trash”- Archive an item to take it off the active list without deleting it — archived items stay available to bring back later. Whole lists can be archived too.
- Trash an item or list to soft-delete it. Trashed things can be restored, or permanently deleted, from the trash view.
Once a shop or a chore is behind you, the Done section’s menu clears it in one go:
- Archive all moves every checked item in the list to the archive.
- Remove all moves every checked item in the list to the trash.
Both cover the whole list rather than only what a filter or search currently shows. Each asks for confirmation first, and the message that follows carries an Undo.